集群软件使用方法
软件统一存放路径
集群上的软件均集中放置在 /appsnew/ 目录下,目录结构如下:
/appsnew/
 ├── bioapps       # 生物信息类软件
 ├── CryoEMapps    # 冷冻电镜相关软件
 ├── mdapps        # 分子设计相关软件
 ├── physapps      # 物理学相关软件
 ├── opt           # 优化与通用工具
 ├── usr           # 用户编译的通用软件(如 gcc, python 等)
 ├── source        # 软件环境配置脚本(启动入口)
 ├── clusterinfo   # 集群说明与信息
 ├── desktop       # 桌面环境相关
 ├── podman        # 容器相关工具
 ├── rocky8.8_opt  # Rocky Linux 8.8 平台兼容软件
 ├── src           # 源码包存放区
├── tmp / testhpc / iso / home # 临时或测试用目录说明:
- 不同类别的软件放置在对应子目录中。
- 在集群中,软件必须通过
/appsnew/source/下的脚本加载,source脚本会自动配置好软件所需的运行环境(路径、依赖库等)
注意
一句话:先 source,再用软件!
1. 使用不同版本的 GCC
集群中预置了多个 GCC 版本,可通过 source 命令加载。
例如加载 gcc-8.3.0c99
source /appsnew/source/gcc-8.3.0c99.sh
which gcc
输出示例:
/appsnew/usr/gcc/gcc-8.3.0c99/bin/gcc其他版本还有
gcc-8.3.0.sh、gcc-9.3.0.sh、gcc-11.3.0.sh、gcc-12.1.0.sh等。gcc-8.3.0c99.sh和gcc-8.3.0.sh区别在于使用了c99标准进行编译。
2. 使用不同版本的 Python
例如加载 Python 3.8.6:
source /appsnew/source/Python-3.8.6.sh
which python
输出示例:
/appsnew/usr/python/Python-3.8.6/virtualenv/bin/python说明:
- 每个 Python 版本自带独立虚拟环境(
virtualenv),避免冲突。 - 退出环境 使用
deactivate命令即可 - 根据项目需求选择合适版本。
3. 使用不同版本的 Conda
集群中预置了多个 Anaconda 、Miniconda版本,可通过 source 命令加载。
示例:加载 Anaconda3-2025.06-1
source /appsnew/source/Anaconda3-2025.06-1.sh环境加载成功后,你会看到命令行提示符发生变化,例如
(base) [skl_lcy@login01 ~]#验证 Python 路径:
which python示例输出:
/appsnew/usr/python/Anaconda3-2025.06-1/bin/python切换 Conda 源
为提升下载速度,可以切换为国内镜像:
# 清华源
cat /appsnew/source/conda.tsu > ~/.condarc && conda clean -i

# 中科大源
cat /appsnew/source/conda.ustc > ~/.condarc && conda clean -i

# 切换回官方源
cat /appsnew/source/conda.official > ~/.condarc && conda clean -i
查看所用源
conda config --show channels && \
conda config --show default_channels && \
conda config --show custom_channels- 不要修改系统 base 环境
- 使用前建议在在个人目录创建属于自己的环境
- 使用镜像源(推荐使用清华源)
4. 使用不同版本的深度学习框架
例如加载 TensorFlow 2.11 环境:
source /appsnew/source/Tensorflow2.11_Keras2.11.0_keras-nightly2.13.0_torch1.13.1_py3.9.4_cuda11.4.4.sh环境加载成功后,你会看到命令行提示符发生变化,例如:
(py3.9.4t2.11) [skl_lcy@login01 ~]#进入 Python 并导入 TensorFlow,在 Python 解释器里执行测试
(py3.9.4t2.11) [skl_lcy@login01 ~]# python
Python 3.9.4 (default, Apr 24 2021, 19:48:02)
[GCC 4.8.5 20150623 (Red Hat 4.8.5-36)] on linux
Type "help", "copyright", "credits" or "license" for more information.
>>> import tensorflow as tf
2025-08-25 11:47:32.971828: I tensorflow/core/platform/cpu_feature_guard.cc:193] This TensorFlow binary is optimized with oneAPI Deep Neural Network Library (oneDNN) to use the following CPU instructions in performance-critical operations:  AVX2 AVX512F AVX512_VNNI FMA
To enable them in other operations, rebuild TensorFlow with the appropriate compiler flags.
2025-08-25 11:47:33.077862: I tensorflow/core/util/port.cc:104] oneDNN custom operations are on. You may see slightly different numerical results due to floating-point round-off errors from different computation orders. To turn them off, set the environment variable `TF_ENABLE_ONEDNN_OPTS=0`.
>>> print("TensorFlow 版本:", tf.__version__)
TensorFlow 版本: 2.11.0
>>>
5. 使用不同版本的 R
集群中预置了多个 R 版本,可通过 source 命令加载。
示例:加载 R-3.5.3
source /appsnew/source/R-3.5.3.sh
which R
输出结果:
/appsnew/usr/R/R-3.5.3/bin/R- 其他版本还有
MRO-3.5.2.sh、R-3.6.3.sh、R-4.2.3.sh、R-4.4.0.sh等。
6. 使用不同版本的 Java
集群中预置了多个 Java 版本,可通过 source 命令加载。
示例:加载 Java JDK 11.0.3
source /appsnew/source/java_jdk-11.0.3.sh
which java
输出结果:
/appsnew/opt/java/jdk-11.0.3/bin/java- 其他版本还有
openjdk-12.0.1.sh、jdk-1.8.0.sh等。
7. 使用不同版本的 FFTW
集群中预置了多个 FFTW 版本,可通过 source 命令加载。
示例:加载 FFTW 2.1.5 (GCC 版)
source /appsnew/source/fftw-3.3.8gcc.sh
which fftw-wisdom
输出结果:
/appsnew/usr/fftw/fftw-3.3.8gcc/bin/fftw-wisdom- 其他版本还有
fftw-2.1.5intel2019.sh、fftw-3.3.8gcc.sh、fftw-3.3.8intel2019.sh等。
8. 使用不同版本的 Boost
集群中预置了多个 Boost 版本,可通过 source 命令加载。
示例:加载 加载 Boost 1.70.0
进入测试目录
mkdir -p ~/lustre1/test
cd ~/lustre1/test
创建测试程序 test_boost.cpp
#include <boost/version.hpp>
#include <iostream>
int main() {
    std::cout << "Boost version: "
              << BOOST_VERSION / 100000 << "."
              << BOOST_VERSION / 100 % 1000 << "."
              << BOOST_VERSION % 100
              << std::endl;
    return 0;
}
加载 Boost 环境并编译
source /appsnew/source/boost_1_70_0.sh
g++ test_boost.cpp -I$BOOST_ROOT/include -o test_boost
运行程序
./test_boost输出结果:
Boost version: 1.70.0- 其他版本还包括:
boost_1_49_0.sh、boost_1_59_0.sh、boost_1_69_0lt.sh、boost_1_69_0.sh等,用户可以根据软件或编译器需求选择合适的版本。
9. 使用 PGI 编译器
集群中预置了 PGI 2019 编译器环境,可通过 source 命令加载:
示例:加载 PGI 2019 (LLVM 版)
source /appsnew/source/pgi2019-llvm.sh
pgcc --version
输出结果:
pgcc 19.4-0 LLVM 64-bit target on x86-64 Linux -tp skylake
PGI Compilers and Tools
Copyright (c) 2019, NVIDIA CORPORATION.  All rights reserved.
表示已成功启用 PGI 编译器。
- 其他版本还包括:
pgi2019.sh—— 非 LLVM 版本
10. 使用不同版本的 GSL
集群中预置了多个 GSL 版本,可通过 source 命令加载。
示例:加载 GSL 2.5
source /appsnew/source/gsl-2.5.sh
gsl-config --version
输出结果:
2.5表示已成功启用 GSL 2.5。
- 其他版本还包括:
gsl-1.16.sh
11. 使用更高版本的构建与工具链软件
集群中预置了常用的工具和依赖库,可通过 source 命令加载指定版本。
示例:加载 CMake 3.14.3
source /appsnew/source/cmake-3.14.3.sh
cmake --version
输出结果:
cmake version 3.14.3

CMake suite maintained and supported by Kitware (kitware.com/cmake).
其他可用版本:
automake-1.16.shgnuplot-5.2.6.shzlib-1.2.11.sh
12. 使用不同版本的 Intel 编译器
集群中预置了多个 **Intel **编译器版本,可根据需求通过 source 命令加载。
示例:加载 Intel 2019
source /appsnew/source/intel2022.sh
which icx
输出结果:
/appsnew/usr/intel/intel2022/compiler/2022.1.0/linux/bin/icx- 其他版本还包括:
intel2018.sh、intel2020u4.sh等
13.使用不同版本的 CUDA 库
集群预置了多个 CUDA 版本,均已包含对应版本的 cuDNN,可根据需求通过 source 命令加载
示例:加载 CUDA 11.8
source /appsnew/source/cuda-11.8.0.sh
nvcc -V
输出结果:
nvcc: NVIDIA (R) Cuda compiler driver
Copyright (c) 2005-2022 NVIDIA Corporation
Built on Wed_Sep_21_10:33:58_PDT_2022
Cuda compilation tools, release 11.8, V11.8.89
Build cuda_11.8.r11.8/compiler.31833905_0- 其他版本还有:
# 常用版本
source /appsnew/source/cuda-11.0.3.sh
source /appsnew/source/cuda-11.3.1.sh
source /appsnew/source/cuda-11.4.4.sh
source /appsnew/source/cuda-11.5.2.sh  #可能不可用
source /appsnew/source/cuda-11.8.0.sh  #可能不可用

# 旧版本
source /appsnew/source/cuda-10.0.sh
source /appsnew/source/cuda-10.1.sh

# 以下不支持2018,2019intel编译器,使用2015或者2013编译器编译
source /appsnew/source/cuda-7.0.28.sh
source /appsnew/source/cuda-7.5.sh
source /appsnew/source/cuda-8.0.61.sh
source /appsnew/source/cuda-9.0-cudnnv7.1.sh
source /appsnew/source/cuda-9.0-cudnnv7.4.2.24.sh
source /appsnew/source/cuda-9.0.sh
source /appsnew/source/cuda-9.1-cudnnv7.1.sh
source /appsnew/source/cuda-9.1.sh
source /appsnew/source/cuda-9.2-cudnnv7.1.sh
source /appsnew/source/cuda-9.2-cudnnv7.4.2.24.sh
source /appsnew/source/cuda-9.2.sh
TIP
CUDA 9.x 版本需手动区分不同的 cuDNN 版本(如 v7.1、v7.4.2.24 等),加载时请选择对应脚本; 自 CUDA 10 起,cuDNN 已随 CUDA 库统一打包,无需单独指定。
14. 使用不同版本的 Amber
集群中预置了多个 GROMACS 版本,可通过 source 命令加载。
示例:加载 Amber18 (Intel2022 编译,CUDA11.1.4.4 环境)
source /appsnew/source/amber22-intel2022-cuda11.4.4.sh
which pmemd.cuda
输出结果:
/appsnew/mdapps/amber22/bin/pmemd.cuda说明 Amber 环境已成功加载。
- 其他版本还包括:
amber18-intel2019-cuda10.1.sh、amber18-intel2021-cuda10.2.1.sh等。
15. 使用不同版本的 GROMACS
集群中预置了多个 GROMACS 版本,可通过 source 命令加载。
示例:加载 GROMACS2024.1-cuda12.3
source /appsnew/source/gromacs2024.1-cuda12.3.sh
which gmx
输出结果:
/appsnew/mdapps/gromacs2024.1-243-cuda12.3/bin/gmx表示已成功启用 GROMACS。
- 其他版本还包括:
gromacs-2018.8.sh、gromacs2021.1.d.sh等。
16. 使用不同版本的 Pymol
集群中提供了基于 Anaconda 的 pymol 2.5 环境,可通过 source 和 conda activate 加载。
示例:加载 pymol 2.5
source /appsnew/source/Anaconda3-2022.05-local.sh
conda activate pymol2.5
验证调用模块:
(pymol2.5) python
>>> import pymolPython 3.8.16 (default, Jan 17 2023, 23:13:24)
[GCC 11.2.0] :: Anaconda, Inc. on linux
Type "help", "copyright", "credits" or "license" for more information.
>>> import pymol
>>>说明 pymol 模块已成功导入
- 或者使用:
/appsnew/mdapps/pymol2.5.4_py37/bin/python
17. 使用 Gaussian
1. 在个人 lustre1 目录中新建 g16 文件夹
mkdir -p ~/lustre1/g162. 拷贝集群上的 Gaussian 程序
cp -r /appsnew/mdapps/Gaussian16/Gaussian16_AVX2 ~/lustre1/g163. 设置权限
chmod -R 750 ~/lustre1/g16/Gaussian16_AVX24. 编写环境激活脚本
vim ~/lustre1/g16/env_g16.sh粘贴以下内容即可
#!/bin/bash

# 设置 Gaussian 根目录(为 g16root 所需)
export g16root=$HOME/lustre1/g16

# 设置 Gaussian 可执行目录
export GAUSS_EXEDIR=$g16root/Gaussian16_AVX2/g16

# 将 Gaussian 添加到 PATH
export PATH=$GAUSS_EXEDIR:$PATH

# 设置 Gaussian 临时文件目录
export GAUSS_SCRDIR=$HOME/lustre1/g16/tmp/$SLURM_JOB_ID
mkdir -p $GAUSS_SCRDIR

echo "✅ Gaussian 16 AVX2 环境已激活($GAUSS_EXEDIR)"
保存后赋予执行权限:
chmod +x ~/lustre1/g16/env_g16.sh5. 使用时激活环境
每次使用 Gaussian 前,在终端中执行
source ~/lustre1/g16/env_g16.sh6. 验证环境激活是否成功
which g16输出应为:
~/lustre1/g16/Gaussian16_AVX2/g16/g1618. 使用 Alphafold3.01
1. 输入结构文件准备
参考官方说明:Google DeepMind Alphafold3 Input Docs
这里以 PDB 结构 1tce 为例,进入测试目录:
cd ~/lustre1/test准备文件 1tce.json
{
  "name": "1tce",
  "modelSeeds": [1, 22, 333, 4444, 66666],
  "sequences": [
    {"protein": {
       "id": "A",
       "sequence": "AEQLRGEPWFHGKLSRREAEALLQLNGDFLVRESTTTPGQYVLTGSQSGQPKHLLLVDPEGVVRTKDHRFESVSHLISYHMDNHLPIISAGSELCLQQPVERKLLEH"
      }
    },
    {"protein": {
        "id": "B",
        "sequence": "GHDGLYQGLSTATK"
      }
    }
  ],
  "dialect": "alphafold3",
  "version": 1
}
说明:
"name": "1tce"→ 定义输出文件夹名。"modelSeeds": [1, 22, 333, 4444, 66666]→ 设置随机种子数,每个种子生成 5 个结构。"sequences"→ 定义蛋白链 ID 和序列。
2. 提交任务脚本
运行任务命令:
bjmurun-l40 1 1 AF3.01RUN.sh 1tce.json这里:
bjmurun-l40→ 提交到gpu_l40分区。- 第一个
1→ 使用 1 个节点。 - 第二个
1→ 使用 1 张 GPU 卡。 AF3.01RUN.sh→ 执行脚本。1tce.json→ 输入文件。
任务提交后,会自动生成以下文件:
[skl_lcy@login01 test]# ls
1tce.json AF3192921_68062.err AF3192921_68062.out alphafold3 job.srp192921job.srp192921→ Slurm 提交脚本,可修改后再次运行。AF3192921_68062.out→ 标准输出。AF3192921_68062.err→ 错误输出。alphafold3→ 环境目录
job.srp192921 示例:
#!/bin/bash
#SBATCH -J AF3192921
#SBATCH -p gpu_l40
#SBATCH -N 1
#SBATCH -o AF3192921_%j.out
#SBATCH -e AF3192921_%j.err
#SBATCH --no-requeue
#SBATCH -A skl_g1
#SBATCH --qos=skll40
#SBATCH --gres=gpu:1
#SBATCH --overcommit
#SBATCH --mincpus=12
pkurun AF3.01RUN.sh 1tce.json
可以添加多任务:
pkurun AF3.01RUN.sh 1shc.json
pkurun AF3.01RUN.sh 19ht.json
pkurun AF3.01RUN.sh 1jq9.json- 注意:pkurun 等同于 srun,也可以直接执行脚本,不需要pkurun。
3. 结果文件解析
任务完成后会生成 1tce/ 文件夹:
[skl_lcy@login01 1tce]# ls
1tce_confidences.json          seed-1_sample-0  seed-22_sample-0  seed-333_sample-0  seed-4444_sample-0  seed-66666_sample-0  TERMS_OF_USE.md
1tce_data.json                 seed-1_sample-1  seed-22_sample-1  seed-333_sample-1  seed-4444_sample-1  seed-66666_sample-1
1tce_model.cif                 seed-1_sample-2  seed-22_sample-2  seed-333_sample-2  seed-4444_sample-2  seed-66666_sample-2
1tce_ranking_scores.csv        seed-1_sample-3  seed-22_sample-3  seed-333_sample-3  seed-4444_sample-3  seed-66666_sample-3
1tce_summary_confidences.json  seed-1_sample-4  seed-22_sample-4  seed-333_sample-4  seed-4444_sample-4  seed-66666_sample-4
关键文件:
*_model.cif→ 预测结构。*_confidences.json→ 置信度。*_ranking_scores.csv→ 打分结果。
1tce_ranking_scores.csv 内容示例:
seed,sample,ranking_score
1,0,0.8010334016888545
1,1,0.8269798979642062
1,2,0.8080210063849947
...
66666,3,0.7990581424937476
66666,4,0.7869926574613606
解释:
- 每个种子(seed)会生成 5 个结构(sample=0..4)。
- ranking_score 越高,说明预测结构越可信。
- 一般选择 排名最高的结构 作为后续分析对象。
1tce_summary_confidences.json 内容示例:
{
 "chain_iptm": [0.76, 0.76],
 "chain_pair_iptm": [
   [0.84, 0.76],
   [0.76, 0.02]
 ],
 "chain_pair_pae_min": [
   [0.76, 1.18],
   [1.1, 0.76]
 ],
 "chain_ptm": [0.84, 0.02],
 "fraction_disordered": 0.12,
 "has_clash": 0.0,
 "iptm": 0.76,
 "ptm": 0.84,
 "ranking_score": 0.83
}| 指标 | 含义 | 数值 | 解读 |
|---|---|---|---|
| pTM | 预测整体构象精度 | 0.84 | 高于 0.8,整体结构预测可信 |
| ipTM | 蛋白-蛋白界面预测精度 | 0.76 | 高于 0.5,说明可能存在相互作用 |
| fraction_disordered | 无序区域比例 (0~1) | 0.12 | 无序比例低,结构较稳定 |
| has_clash | 原子冲突情况 | 0.0 | 无明显原子冲突 |
| ranking_score | 综合打分 | 0.83 | 高于 0.75,预测结果可信 |
| chain_pair_iptm | 链间界面 TM-score 矩阵 | A-A:0.84, A-B:0.76 B-A:0.76, B-B:0.02 | A-B 跨链 ipTM=0.76,说明界面预测精度可靠 |
| chain_pair_pae_min | 链间最小 PAE 误差矩阵 (Å) | A-A:0.76, A-B:1.18 B-A:1.10, B-B:0.76 | A-B 跨链误差 ~1 Å,说明链间相对位置预测可靠 |
- 整体可信度高:pTM=0.84,ipTM=0.76。
- 复合物相互作用可靠:A-B 界面预测 TM-score 较高,跨链误差低。
- 结构稳定:fraction_disordered=0.12,预测模型有序;has_clash=0.0,无冲突。
- 综合评分 ranking_score=0.83 → 高于 0.75,预测模型可信度强。
结构对比:
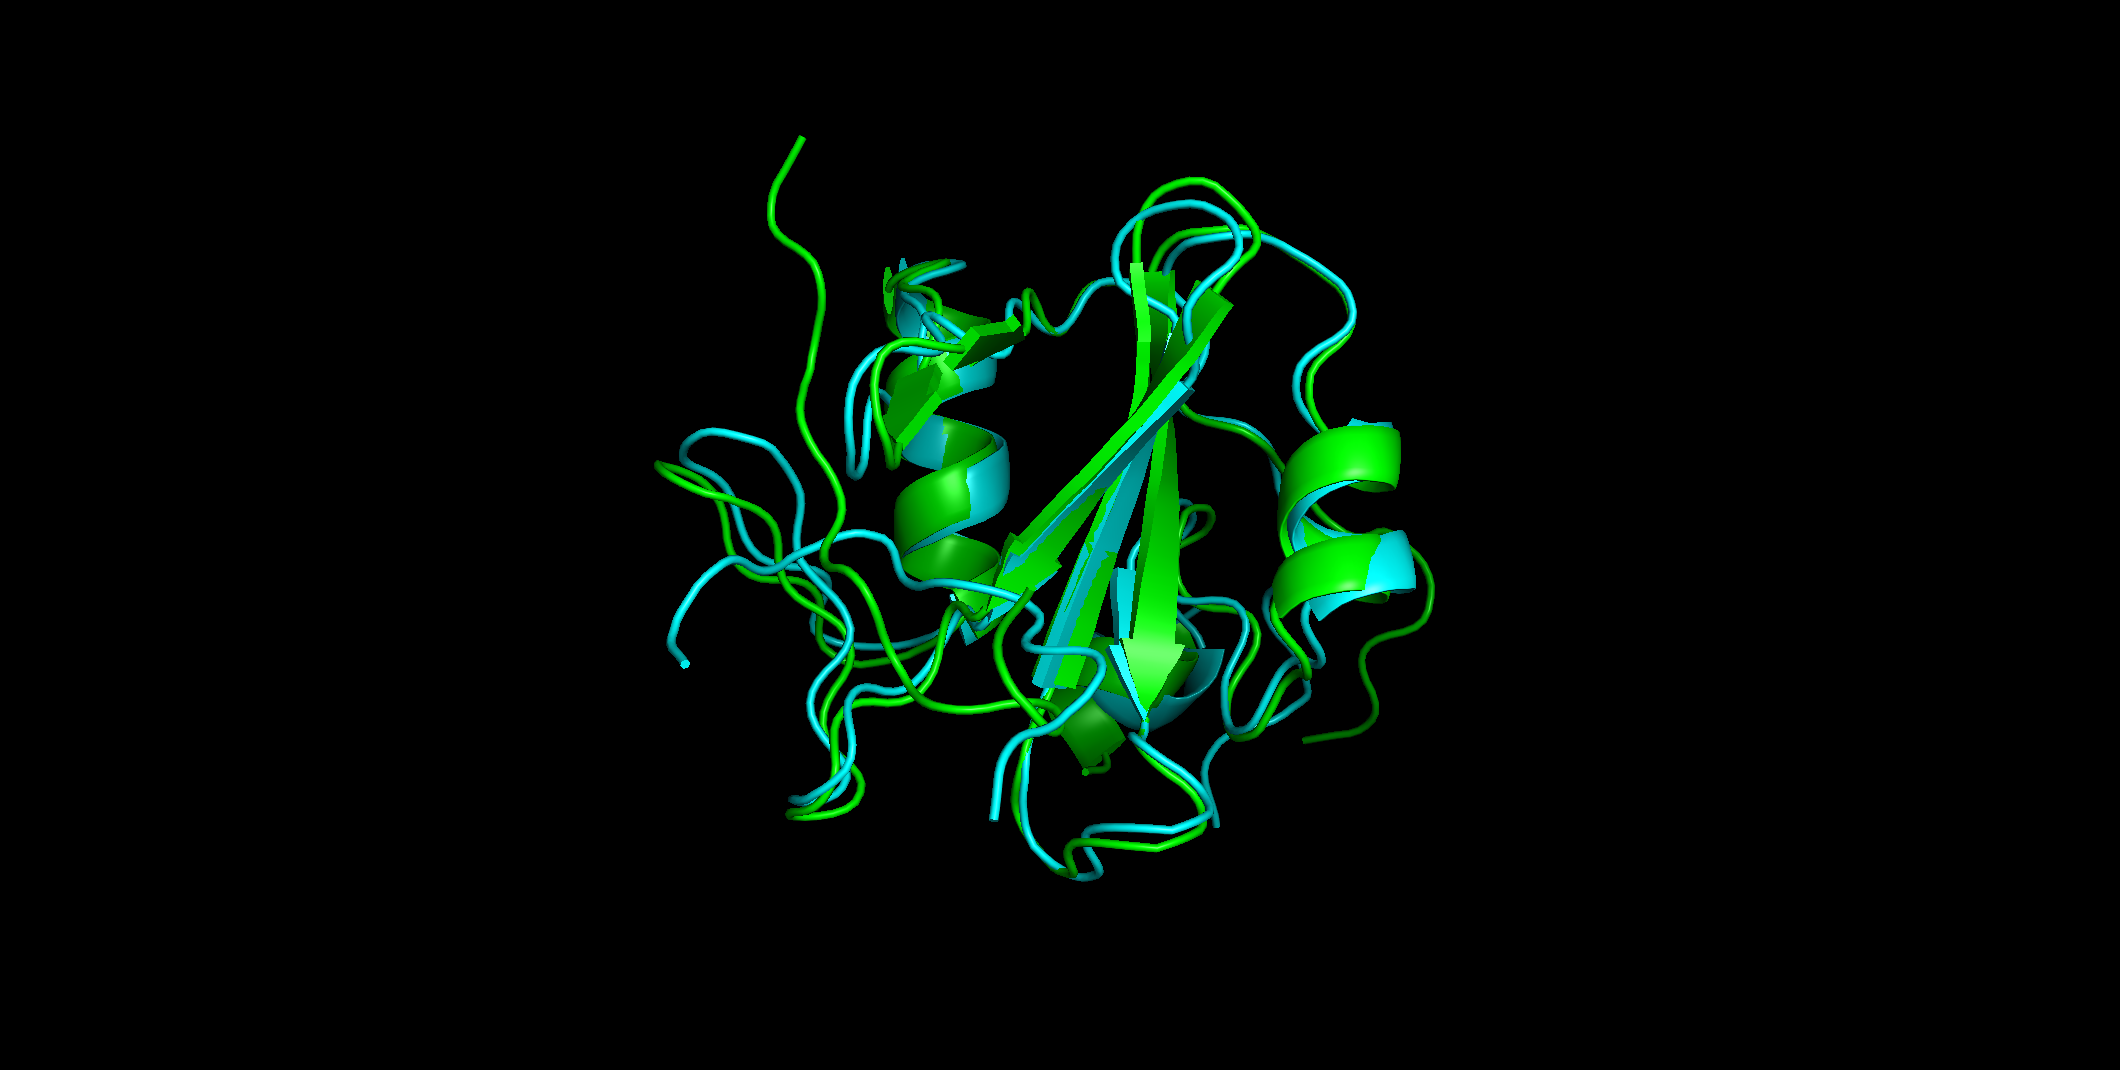
- 青色 → PDB 实验结构(核磁)。
- 绿色 → AF3.01 预测结构。
- RMSD = 1.214 (725 to 725 atoms)。
RMSD 1.214 Å 表示实验结构与预测结构之间的平均原子坐标偏差约为 1.2 Å,在结构生物学里属于 高一致性(通常 <2 Å 就认为预测和实验结果非常接近)。
差异主要集中在柔性 loop 区域,不影响整体结构可信度。
4. 其他 GPU 分区
默认推荐 gpu_l40,因为是单卡节点。
如果需要,也可提交到其他分区:
bjmurun-l48  1 1 AF3.01RUN.sh 1tce.json
bjmurun-h100 1 1 AF3.01RUN.sh 1tce.json # 当前暂不支持AF3.01,请投其他分区
bjmurun-a800 1 1 AF3.01RUN.sh 1tce.json
WARNING
这些分区一般为 8 卡节点,不建议单卡跑